Person Looking Through Plane Window Drawing
As you create a model in 3D, you demand to view it from all sides. In SketchUp, you orbit, zoom, and pan all the time as you lot draw:
- Orbit: When you orbit, yous move around, above, or below your model. Orbiting is similar flying around your model Peter Pan–style.
- Zoom: Zoom in to focus on a specific expanse equally yous depict, and zoom out to see more of your model.
- Pan: When you pan, you move left, correct, up, or downwards.
Tip: Because y'all use these tools oft, SketchUp enables y'all to switch to each i temporarily, using a three-button scroll wheel mouse. (You learn the mouse shortcuts later on in this article.) If yous practise much drawing in SketchUp, a three-push button scroll wheel mouse makes modeling easier than modeling without a whorl wheel or with a one-push mouse.
To come across how these tools work, check out the overview in the following video, or read the upcoming sections for steps that guide y'all in using these tools.
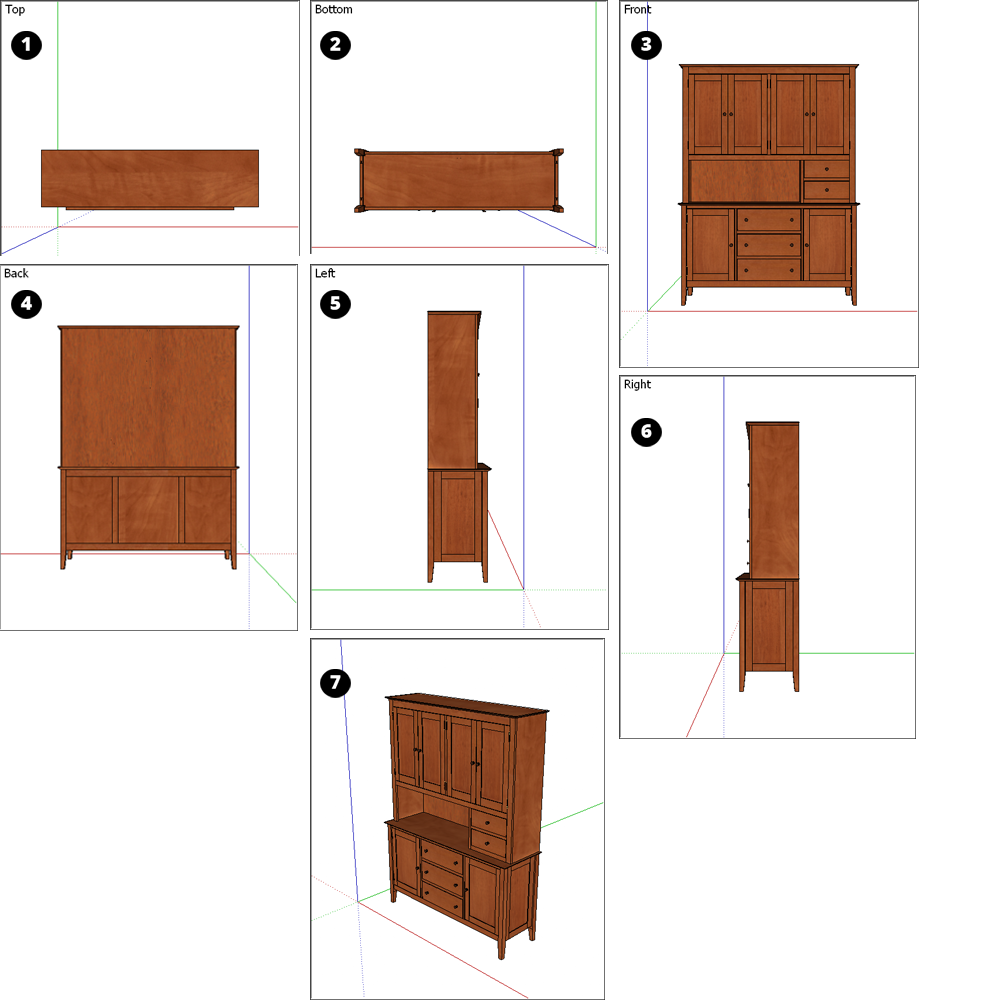
In add-on to the navigation tools, SketchUp includes several standard views, which you find on the Camera menu. In the following figure, you see how a model looks in each of the standard views: Tiptop (Callout i), Lesser (2), Front (3), Dorsum (4), Left (v), Right (6), and Iso (7).
Tip: When you use the standard views or the more avant-garde features of the navigation tools, call back that SketchUp uses the concept of a camera to represent your view. Every bit you switch and alter your view, information technology'due south as though you lot're looking through a camera.
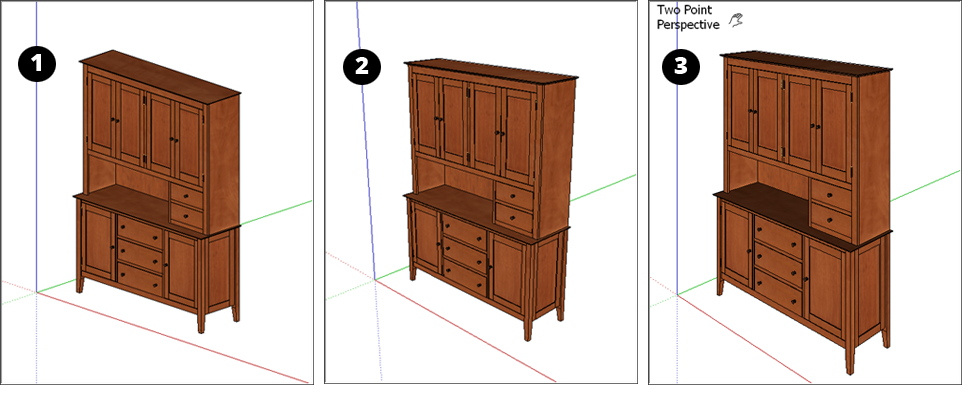
SketchUp'due south Camera menu too has three perspective options, shown in the following figure, that change how you lot view your model:
- Parallel Projection: In this view, lines appear parallel in both 3D and 2d space. This view is besides known as an orthographic view. When you print in this view, line length has a scale (for case 4' in SketchUp = 1" on paper). (Callout ane)
- Perspective: In this view, lines vanish to a horizon, so sure items announced closer while other items appear to be far away. Entities are non to scale. This is SketchUp'due south default view. (Callout two)
- Ii-Point Perspective: Illustrators often utilize 2-point perspective to draw 3D buildings and concept art. In SketchUp, choosing this view aligns your perspective so that the view has two vanishing points. (Callout 3)
Tip: SketchUp can simulate what it's like to walk through a model and look around. This technique is often used to present a completed model. Y'all tin can too save specific views equally scenes, which you can then breathing. Meet Communicating Your Designs for details. If you lot're looking for ways to hide geometry or view hidden geometry, come across Softening, Smoothing, and Hiding Geometry.
Tabular array of Contents
- Orbiting effectually a 3D model
- Panning side to side and upwardly and downwards
- Zooming in and out
- Changing the field of view
- Setting a standard view
- Choosing your perspective
- Returning to a previous view
Orbiting around a 3D model
Orbiting enables you to view geometry from the outside. To rotate the camera about a model, actuate the Orbit tool ( ), which you find in the following areas of the SketchUp interface:
- Camera > Orbit on the menu bar
- Photographic camera toolbar (Microsoft Windows)
- Getting Started toolbar
- Large Tool Set toolbar
- Tool palette (macOS)
Tip: You can temporarily actuate the Orbit tool while in any other tool (except the Walk tool):
- On a three-button mouse: Click and hold the ringlet wheel.
- On a one-button mouse: If you lot use macOS, press and hold the Command and Command keys while clicking and property the left mouse button.
To orbit using the Orbit tool, follow these steps:
- Select the Orbit tool () or press the O key.
- Click anywhere in the drawing area.
- Move your cursor in whatever management to rotate around the eye of the drawing area.
Beyond basic orbiting, the Orbit tool can do a few other tricks:
- To center a model in the cartoon surface area, double-click in the drawing area.
- To ringlet the photographic camera on its side as you lot orbit, press and hold the Ctrl key (Microsoft Windows) or Option fundamental (macOS). This suspends the Orbit tool's built-in sense of gravity, which keeps vertical edges pointed upwards and down.
Panning side to side and up and downward
When y'all pan, SketchUp's camera (your view) moves vertically or horizontally. Here's where you find the Pan tool ( ):
):
- Camera > Pan on the menu bar
- Camera toolbar (Microsoft Windows)
- Getting Started toolbar
- Large Tool Prepare toolbar
- Tool palette (macOS)
Tip: You switch to the Pan tool temporarily while you're in another tool:
- On a three-push scroll wheel mouse, hold down the coil wheel and the left mouse button.
- On a one-button mouse or trackpad, press and concur the Control, Command, and Shift keys simultaneously while holding down the mouse button.
- On whatever mouse, if the Orbit tool is selected, press and hold the Shift cardinal.
To pan using the Pan tool, follow these steps:
- Select the Pan tool () or press the H key.
- In the drawing surface area, click and drag the cursor in any direction.
Zooming in and out
In SketchUp, every bit in many other programs, you can zoom in for an extreme close upwards, or zoom out to see the bigger film. Equally you draw a 3D model, zooming in can aid you align edges and faces more precisely, whereas zooming out enables yous to see your overall model or re-orient yourself so you can find a different part of your model to work on.
SketchUp also has 2 specialized zoom tools, Zoom Extents ( ) and Zoom Window (
 ), which you learn about after in this section.
In the SketchUp interface, hither'south where you find the Zoom tool ( ):
):
- Camera > Zoom on the card bar
- Photographic camera toolbar (Microsoft Windows)
- Getting Started toolbar
- Tool palette (macOS)
Tip: To zoom while using another tool, such as the Line or Motion tool, you need a gyre cycle mouse. Curl up to zoom in or down to zoom out. When you lot zoom past scrolling, SketchUp uses your cursor every bit the zoom's centre point.
To zoom in and out, follow these steps:
- Select the Zoom tool () or press the Z primal.
- Click and elevate upwardly to zoom in; click and drag down to zoom out. When you zoom by dragging the Zoom tool cursor, SketchUp zooms in or out from the middle of the screen.
Note: The zoom speed depends how far your geometry is from the Zoom cursor. When geometry is farther away, SketchUp zooms quickly. The zoom speed feels slower when your geometry is relatively close to the Zoom cursor.
To instantly make your whole model visible and centered in the cartoon area, click the Zoom Extents tool () or printing Shift+Z. Y'all detect Zoom Extents in the following corners of the SketchUp interface:
- Camera > Zoom Extents on the bill of fare bar
- Photographic camera toolbar (Microsoft Windows)
- Getting Started toolbar
- Large Tool Set toolbar
- Tool palette (macOS)
To zoom in on a specific rectangular portion of your model, use the Zoom Window tool. (Y'all detect Zoom Window in the same places where you find the Zoom and Zoom Extents tools, with the exception of the Getting Started toolbar.) To zoom in on a portion of your model:
- Select the Zoom Window tool ().
- Click and drag to make a box appear around the area that you want to zoom in on. When you release the mouse push button, everything in the box you lot drew fills the cartoon surface area.
Irresolute the field of view or focal length
A bottom-known Zoom tool feature is changing the field of view, or how much of your model you tin run into. Because your view in SketchUp is like looking through a camera, you can adjust the field of view in degrees. Alternatively, modify the focal length using millimeters, equally you lot do in a photographic camera.
Tip: If you're unfamiliar with the field-of-view concept, call back of it this way: Humans have a field of view that's about 180 degrees in front of them. If yous narrowed that field to ninety degrees, you lot'd lose your peripheral vision.
To suit the field of view or focal length, follow these steps:
- Select the Zoom tool or printing the Z key. Yous tin besides select Camera > Field of View from the menu bar.
- Type a value in degrees or millimeters, respectively. For example, typing 45 deg sets a 45 caste field of view; typing 35 mm sets a focal length equivalent to a 35mm camera. Or, to visually adapt the field of view, agree downwards the Shift key while dragging the Zoom tool.
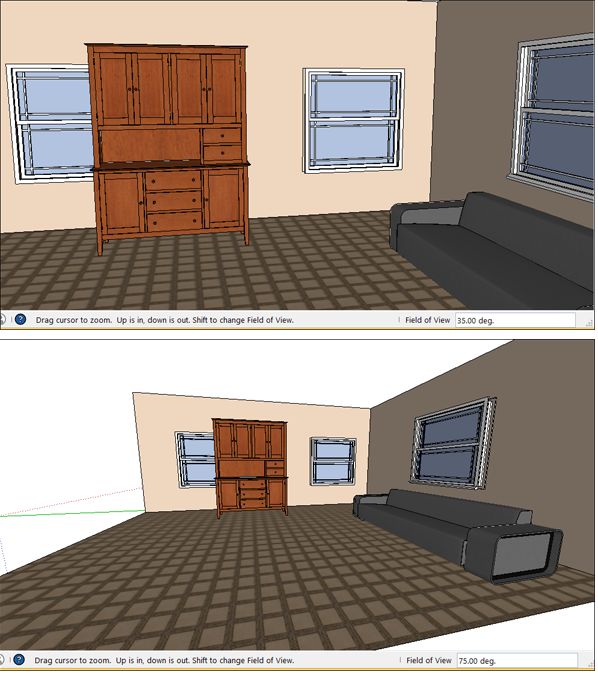
Tip: Wider fields of view are useful when working within a room, where you might want to see more than of the room as you draw. The following figure shows the same room at two dissimilar fields of view. In the superlative figure, the field of view is 35 degrees. In the lesser figure, the field of view is 75 degrees.
Setting a standard view
Y'all can immediately modify the drawing window to any of the standard views by selecting Camera > Standard Views and selecting your desired view from the submenu. Your options are as follows: Acme (Callout 1), Bottom (Callout 2), Forepart (Callout 3), Back (Callout 4), Left (Callout 5), Right (Callout 6), and Iso (Callout 7). Come across an case of each one in the following figure.
Tip: To keep the standard views only a click away, brandish the Views toolbar. See Customizing Your Workspace for details.
Notation: Iso stands for isometric. In a true isometric view, which is common in technical or mechanical drawings, a 3D object is drawn in second infinite from a specific bending, so that the angle between each drawing axis is 120 degrees. However, in SketchUp, the Iso photographic camera view is not the same as an isometric projection, in which objects along the x, y or z axis are in proportion. SketchUp's Iso view simply shows your whole model from a standard angle.
Tip:To quickly align SketchUp's bespeak of view to exist top-down with axis centered, context-click a cartoon axis and select Align View from the menu that appears.
Returning to a previous view
SketchUp remembers your views every bit y'all move from i to the next. To return to the preceding view, select Photographic camera > Previous. After you render to a view, you can move to a subsequently view past selecting Camera > Adjacent.
Tip: To go along the Previous command handy, display the Big Tool Set toolbar or the Camera toolbar. (See Customizing Your Workspace for details.) You lot can click the Previous tool to motility astern one view at a time.
thompsonthersim1982.blogspot.com
Source: https://help.sketchup.com/en/sketchup/viewing-model
0 Response to "Person Looking Through Plane Window Drawing"
Postar um comentário